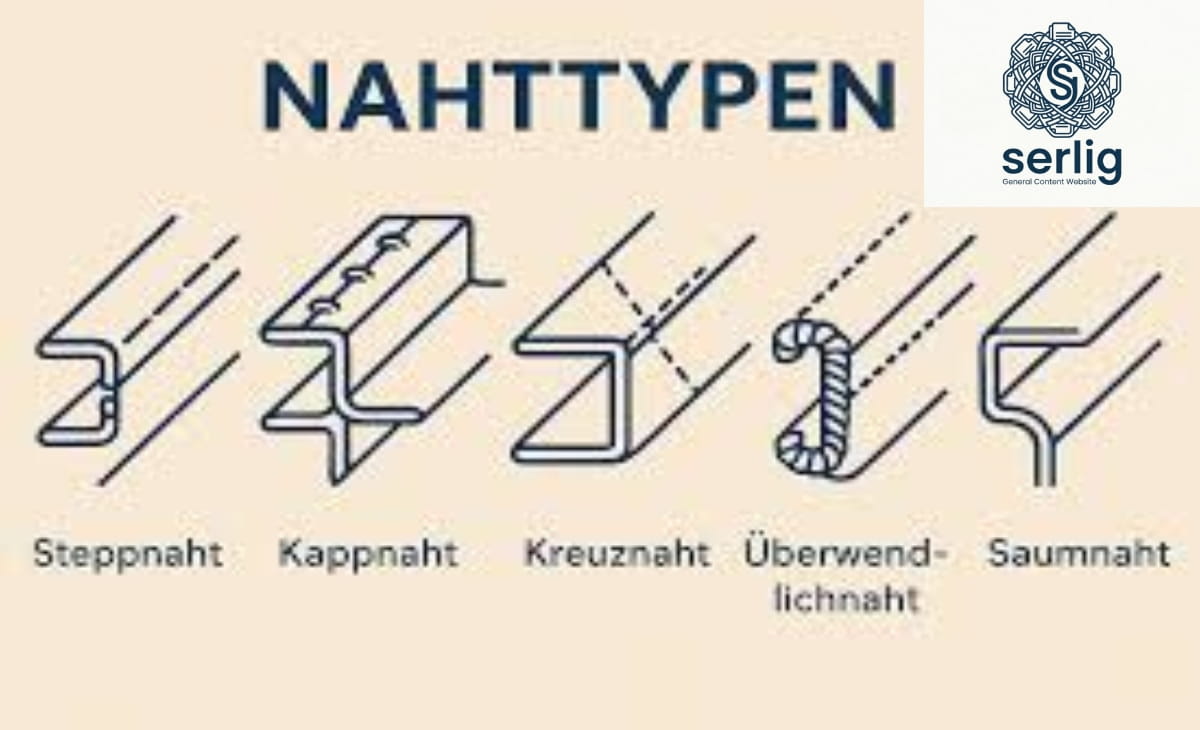
Nahttypen Explained: The Only Seam Type Guide You’ll Ever Need to Sew Like a Pro
Whether you are just picking up a needle and thread for the first time or you have spent years behind a sewing machine, understanding the different Nahttypen the German word for seam types — is, without question, one of the most important foundations of quality sewing. In fact, choosing the wrong seam for a project can cause garments to tear, edges to fray, or finished pieces to look amateurish. On the other hand, mastering the right seam types transforms your work from simply homemade to genuinely handcrafted.
Because there are so many seam types to learn, it can feel overwhelming at first. However, once you understand the logic behind each one, the choices become second nature. This comprehensive guide walks you through all the essential Nahttypen, explaining what each one is, when to use it, how to create it, and what makes it stand out. By the end, you will have a clear understanding of which seam type belongs in which situation — and your sewing projects will reflect that knowledge.
Quick Fact Table
| Nahttyp (Seam Type) | Skill Level | Best Fabric | Elasticity | Main Purpose |
| Straight Stitch (Steppnaht) | Beginner | Cotton, linen, denim | None | Joining fabric pieces |
| Zigzag (Zickzacknaht) | Beginner | Knits, mixed fabrics | Medium | Edge finishing, stretch sewing |
| Overlock (Overlocknaht) | Intermediate | Jersey, activewear | High | Professional edge finishing |
| Hem Seam (Saumnaht) | Beginner | All fabrics | Low | Finishing garment edges |
| French Seam (Französische Naht) | Intermediate | Silk, chiffon, sheers | None | Clean interior finish |
| Flat-Felled (Kappnaht) | Intermediate | Denim, canvas | None | Maximum strength seaming |
| Blind Hem (Blindstich) | Intermediate | Fine wovens | None | Invisible hemming |
| Basting Stitch (Heftnaht) | Beginner | All fabrics | None | Temporary placement |
What Are Nahttypen (Seam Types)?
Before diving into the individual types, it is helpful to understand what Nahttypen actually means. The term Nahttypen refers to the different methods and structures used to join fabric layers together, finish raw edges, or add decorative detail through stitching. Moreover, each seam type has its own stitch structure, appearance, strength, and elasticity — and as a result, each one is suited to particular fabrics and purposes.
At the broadest level, all seam types fall into three main categories:
- Construction seams — These permanently join pieces of fabric together and, therefore, form the structural backbone of any garment or textile item.
- Finishing seams — These prevent raw edges from fraying and, consequently, give the inside of a garment a clean, professional appearance.
- Decorative seams — These serve primarily aesthetic purposes, adding visual texture, dimension, or style to a finished piece.
The right choice of Nahttypen depends on several factors: the type of fabric, the amount of stretch needed, the desired level of durability, and the final look of the project. With that framework in mind, let us explore each seam type in detail.
The Most Important Nahttypen Explained
The Straight Stitch Seam (Steppnaht) The Foundation of All Seam Types
First and foremost, the straight stitch seam, known in German as the Steppnaht, is the most basic and most widely used seam in sewing. It is formed by a simple, straight line of machine stitching and, as a result, serves as the starting point for nearly every sewing project.
Best used for:
- Joining the main pieces of garments like trousers, dresses, and jackets
- Making bags, pouches, and fabric accessories
- Sewing non-stretch woven fabrics like cotton, linen, and denim
Characteristics: The straight stitch seam is strong, easy to execute, and works beautifully on firm, stable fabrics. However, its main limitation is a lack of elasticity. When used on stretch fabrics like jersey or lycra, it will snap under pressure. For this reason, other Nahttypen are required for those materials.
Practical tip: Always backstitch at the beginning and end of every straight seam to lock the stitches in place and prevent unraveling over time.
The Zigzag Seam (Zickzacknaht) Flexible and Versatile
In contrast to the straight stitch, the zigzag seam (Zickzacknaht) is one of the most versatile Nahttypen available on a standard sewing machine. Its back-and-forth motion gives it natural stretch and, consequently, makes it ideal for finishing edges and working with knit fabrics.
Best used for:
- Finishing raw edges to prevent fraying
- Sewing stretch and knit fabrics such as jersey and spandex blends
- Attaching appliqués and patches
- Repairing torn seams or holes
Characteristics: You can adjust both the stitch width and stitch length to suit different fabrics. Specifically, a wider zigzag provides more elasticity and strength, while a narrow one is subtler and works well as an edge finish. Furthermore, for sewers who do not own an overlock machine, the zigzag stitch is the most practical go-to alternative.
Practical tip: When finishing edges with a zigzag stitch, sew close to the raw edge — but not so close that the stitch falls off the fabric.
The Overlock Seam (Overlocknaht) — Professional Quality at Home
If you are serious about sewing, the overlock seam (Overlocknaht) is a game-changer. It is produced by a specialized serger or overlock machine, which simultaneously cuts, sews, and finishes the edge in a single pass. As a result, you get a clean, elastic, industrial-quality seam that is instantly recognizable from ready-to-wear clothing.
Best used for:
- T-shirts, leggings, and activewear made from stretch fabrics
- Underwear and swimwear
- Any project requiring high elasticity and clean internal finishing
Characteristics: The overlock seam is fast, durable, and extremely stretch-friendly. In addition, it gives raw edges a neat, fringe-free finish that holds up well through repeated washing and heavy use. The main barrier, however, is the machine itself — a serger is an additional investment. Nevertheless, most modern sewing machines offer an overlock-style stitch as a practical alternative.
Practical tip: Even without a serger, check your sewing machine’s stitch menu. Many machines include a stretch overlock stitch that closely mimics the results of a dedicated overlock machine.
The Hem Seam (Saumnaht) Clean, Polished Edges
Moving on to garment finishing, the hem seam (Saumnaht) is not a single stitch but rather a family of techniques all aimed at the same goal: finishing the lower edge of a garment neatly. Since hems are one of the most visible elements of any clothing item, a well-executed hem instantly signals quality.
Common variations:
- Single hem: The raw edge is folded once and stitched down — quick and suitable for heavier fabrics.
- Double hem: The edge is folded twice, enclosing the raw edge completely. This, in turn, gives a very clean finish on the inside and works well with medium-weight fabrics.
- Rolled hem: A very narrow, delicate hem ideal for lightweight fabrics like satin, chiffon, and georgette.
- Blind hem: A nearly invisible hem that shows only tiny stitch points on the right side of the fabric — more on this below.
Practical tip: Always press the hem allowance with an iron before stitching. This simple step ensures straight, even hems and dramatically improves the finished look.
The French Seam (Französische Naht) Elegance and Clean Finishing in One
For those working with delicate or sheer fabrics, the French seam (Französische Naht) is, without a doubt, the most elegant solution. It is a refined seam type that encloses all raw edges completely, leaving no fraying threads visible from either the inside or outside of a garment.
How to sew a French seam:
- Place fabric pieces wrong sides together and sew a narrow seam approximately 0.5 cm from the edge.
- Next, press the seam open, then fold the fabric so the right sides are now together, enclosing the first seam inside.
- Finally, stitch again, this time 0.7–1 cm from the folded edge, which fully encloses the raw edges of the first seam.
Best used for:
- Delicate blouses and shirts in silk or fine cotton
- Sheer fabrics like organza and chiffon where the interior seam is visible
- High-end evening wear and bridal garments
Characteristics: Although the French seam requires more time and precision than a straight seam, the payoff is a luxurious interior finish that clearly elevates the quality of any garment. It is especially valuable, therefore, when working with fabrics that are difficult to overlock neatly.
The Flat-Felled Seam (Kappnaht) Built for Durability
When strength is the top priority, the flat-felled seam (Kappnaht) is the best choice among all Nahttypen. You see it on the side seams and inseams of almost every pair of jeans — that double row of parallel topstitching is the hallmark of this seam type.
How to create a flat-felled seam:
- First, sew the pieces together with a regular straight seam.
- Then, press both seam allowances to one side.
- After that, fold the upper allowance over the lower one, enclosing its raw edge.
- Finally, topstitch close to the folded edge, creating a second parallel stitch line.
Best used for:
- Denim jeans and jackets
- Work wear and uniforms
- Outdoor gear, bags, and canvas products
Characteristics: Because the flat-felled seam distributes stress across two rows of stitching, it is extraordinarily resistant to tearing. Furthermore, it has a handsome, craft-forward appearance that suits casual and rugged aesthetics perfectly.
The Blind Hem Stitch (Blindstich) Nearly Invisible
For garments where visible stitching would ruin the look, the blind hem stitch (Blindstich or Blindnaht) is the ideal solution. It is designed to be almost completely invisible from the right side of the fabric, with only tiny, near-imperceptible stitch points showing on the surface.
Best used for:
- Trouser hems on dress pants and suits
- Skirts and evening gowns
- Curtains and drapes
- Coat and jacket hems
By hand: The thread is guided so that it catches only a single thread of the fabric on the visible side, leaving the hem nearly hidden. It takes practice, but it produces a truly professional result.
By machine: Many sewing machines include a blind hem stitch and a special presser foot. This speeds up the process considerably without sacrificing the neat appearance.
The Basting Stitch (Heftnaht) Temporary but Essential
Last but not least, the basting stitch (Heftnaht) is a long, loose, temporary stitch used to hold fabric pieces in position before the permanent seam is sewn. Once its job is done, it is simply removed.
Best used for:
- Fitting garments before final stitching
- Positioning zippers, pockets, and decorative elements accurately
- Holding slippery fabrics in place during sewing
Practical tip: Always use a contrast-colored thread for basting stitches so they are easy to spot and remove after the permanent seam is in place.
Choosing the Right Nahttypen for Your Fabric
One of the most common mistakes in sewing is mismatching a seam type with the fabric. To help you avoid this, here is a practical reference guide:
| Fabric Type | Recommended Nahttypen |
| Heavy denim | Flat-felled seam, straight stitch |
| Jersey / stretch knit | Overlock seam, zigzag seam |
| Silk / chiffon | French seam, rolled hem |
| Cotton woven | Straight stitch, zigzag, overlock |
| Wool / tweed | Straight stitch, open seam |
| Synthetic / polyester | Zigzag seam, overlock seam |
Common Mistakes to Avoid with Nahttypen
Even skilled sewers fall into these traps occasionally. Therefore, it is worth reviewing these common errors before starting your next project:
- Wrong stitch length: Too long on delicate fabrics weakens the seam; too short, on the other hand, makes it rigid and nearly impossible to unpick.
- Skipping backstitching: Failing to secure the start and end of a seam means it can unravel with washing or wear.
- Wrong needle type: Always use a stretch needle for knit fabrics. Otherwise, a standard needle can create skipped stitches or cause runs in the fabric.
- Skipping the iron: Pressing seams after each step is not optional — in fact, it is what separates clean, professional results from untidy, puckered ones.
Conclusion
To sum up, every sewist regardless of skill level should have a working command of at least five core Nahttypen: the straight stitch seam, the zigzag seam, the hem seam, the blind hem stitch, and if a serger is available the overlock seam. In addition, for those working with fine or luxury fabrics, the French seam is an invaluable technique to master. Similarly, anyone sewing denim or heavy-duty textiles will greatly benefit from learning the flat-felled seam.
Ultimately, understanding which seam type to use and executing it well is the difference between a garment that merely holds together and one that is genuinely well-made. The seam is invisible when done right, but unmistakable when done wrong. As a result, investing time in learning these techniques will pay off in every project you touch.
In short, sewing is a craft built on small decisions made well. Therefore, choose your Nahttypen wisely, and your work will speak for itself.
You might also find this related article interesting: Bonni Sue Chalkin: The Inspiring Story of a Fashion Designer, Healer, and Bestselling Author
FAQs
What is the most important Nahttyp for beginners to learn first?
The straight stitch seam (Steppnaht) is, without a doubt, the best starting point for beginners. Because it is the simplest and most widely used seam in sewing, mastering it first gives you the foundation to understand all other Nahttypen. Once you are comfortable with straight stitching, you can gradually move on to more advanced techniques like the zigzag seam or French seam.
Can I use a regular sewing machine to sew stretch fabrics, or do I need a serger?
Yes, you can absolutely use a regular sewing machine for stretch fabrics. In fact, most modern machines include a zigzag stitch and even an overlock-style stitch specifically for this purpose. However, if you sew knit fabrics frequently, investing in a serger or overlock machine will give you significantly cleaner and more durable results. In the meantime, the zigzag stitch is a perfectly reliable substitute.
What is the difference between a French seam and a flat-felled seam?
Although both seams enclose raw edges and produce a clean finish, they serve very different purposes. The French seam is designed for delicate, lightweight fabrics like silk and chiffon, where a soft, elegant interior is the priority. The flat-felled seam, on the other hand, is built for heavy, rugged fabrics like denim, where maximum strength and durability are required. Therefore, the choice between the two depends entirely on the fabric and the function of the garment.
How do I fix a seam that has started to come apart?
First, assess how much of the seam has opened. If it is a short section, you can often re-sew it by machine using the same seam type as the original. If the fabric edges have frayed significantly, trim them neatly and then sew a zigzag stitch along the raw edges before re-joining. For larger repairs on stretch fabrics, using an overlock or zigzag seam will give the repaired area the flexibility it needs to hold up with wear.
Why do my seams pucker even when I use the correct Nahttyp?
Puckering is usually caused by one of three things: incorrect thread tension, the wrong needle size for the fabric, or skipping the step of pressing the seam with an iron. To fix this, first check your machine’s tension settings and adjust if needed. Next, make sure you are using the right needle — a finer needle for lightweight fabrics and a stronger one for heavier materials. Finally, always press seams flat with a steam iron as you go. This step alone eliminates most puckering issues and is, in fact, one of the most important habits any sewist can develop.